How to Take a Passport Photo at Home
You do not need a studio or a booth for a passport photo. A phone camera, a window, and a plain wall are enough, and the result is usually better than a booth because you can retake it until it is right. What trips people up is not the camera, it is the setup: shadows on the wall, a face too small in the frame, or light from the wrong direction. This guide walks the whole thing in order, from where to stand to how to crop and print, so the photo passes the first time.
What You Need
A phone from the last few years takes a photo sharp enough for any passport office. Beyond that you want a plain light-colored wall with nothing on it, daylight from a window, and ideally a second person to hold the phone. If you are alone, a small tripod or a stack of books to prop the phone on works, with the self-timer or a voice shutter. Skip the flash entirely.
Setting Up
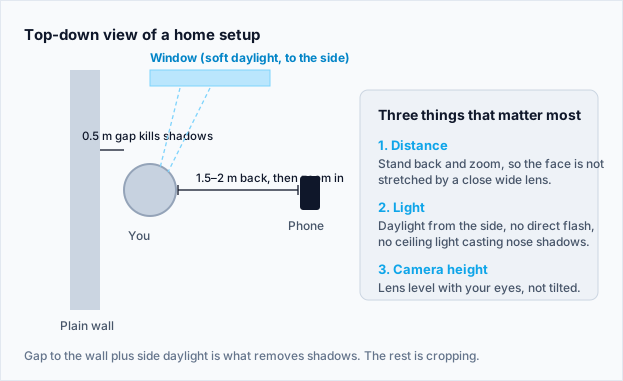
The setup is where the photo is won or lost. Stand about half a meter in front of the wall, not against it, so any shadow you cast falls low and out of the frame. Face a window so soft daylight lands evenly on your face, or turn slightly so the light comes from one side without creating a hard shadow on the other. Keep the phone at your eye level, not above or below, because a raised phone tilts your chin down and a low one makes you loom. Then have the photographer step back and zoom in rather than come close, since a close lens distorts the face.
Taking the Shot
Look straight at the lens with a neutral expression, mouth closed, both eyes open. Keep your shoulders square and your head straight, not tilted. Frame loosely, with space above your head and down to your chest, because you will crop in afterwards and you want room to work with. Take ten or more shots and pick from them rather than trusting one. A tiny blink or a hint of a smile is easy to miss on the phone screen and obvious to a reviewer.
Cropping to the Right Size
This is the step that turns a normal photo into a passport photo, and it is where the head-height rule gets met. You crop to your country proportions (2 by 2 inches for the US, 35 by 45 mm for most others) while positioning the head so that crown to chin fills 50 to 69% of the height with a small gap above. Doing this by eye in a photo editor is fiddly because you are matching two things at once, the outer ratio and the head height. A tool that knows the target size and finds the head for you removes the guesswork.
Upload your shot and it is cropped to the exact country size with the head placed at the correct height, background checked, free in the browser.
Crop and Check My PhotoPrinting It
For a digital application you upload the cropped file directly, so you are done once it meets the pixel and file-size limits. For a printed application, print on photo paper at the exact physical size, either at home on a photo printer or by taking the cropped file to a pharmacy or print shop. Many print services offer a 4 by 6 inch sheet with the photo laid out to size, which is the cheapest route. Do not print a 2 by 2 photo onto plain paper, because passport offices reject matte and printer paper.
Frequently Asked Questions
Can I use a phone for a passport photo?
Yes. Any recent phone camera is sharp enough. The camera is rarely the problem; the setup and cropping are. Stand away from the wall, use soft daylight, keep the phone at eye level, and crop to the right size afterwards.
Should I use the front or rear camera?
The rear camera. It is higher resolution and less distorted than the selfie camera, and taking the photo from a distance with the rear lens keeps the face in natural proportion. Use a timer or ask someone to press the shutter.
Why does my photo have a shadow behind my head?
You are standing too close to the wall. Move about half a meter forward so the shadow falls low and out of frame, and light your face from the front with soft daylight rather than a single overhead lamp or flash.
Do I need a white wall specifically?
Plain and light is what matters: white or very light grey with no pattern or objects. A light wall works if it is evenly lit and shadow-free. You can also correct a slightly off background when you crop, but you cannot fix a busy or shadowed one.